
My Friday Faves-January 15, 2016
What do you see when you look up in your home…
Sadly, the ceiling is a forgotten space in most homes and spaces I see. Mostly because unless there is some architectural detail like cathedral, vaulted or coffered ceiling in the space it's really never looked at much, except maybe if you have insomnia and are lying there staring at it trying to fall asleep! Some people may be intimidated by the blank space, not quite sure what to do with it. Or you may feel like why bother spending time and money on ceiling details when no one looks up! I say give them a reason to look up, let the ceiling be the crowning jewel piece of the space, the icing on the cake! After all, except for possibly light fixtures or skylights, there are no annoying obstructions to deal with as with walls. I believe the ceiling is a great space to add a bit of interest, either subtle or drtamatic, to a room. While some ceiling details are usually created in the construction stage of a project, as with tray or coffered ceilings, some details can be added later with minimal cost and skill. Here I'll go through a few of my favorites, both DIY and professionally crafted.
My very favorite of all ceiling details is the coffered style. These ceiling details came into vogue during the late eighteenth and early twentieth century when there was a revival in classical home styles. This ceiling detail is usually done by skilled craftsman, however many DIY tutorials are available for the mid level carpenter. You can find plans on This Old House magazine.
 |
| Found on Home Bunch |
 |
| Found on Howtodecorate.com |
Looking at the construction detail of a coffered ceiling below, you can see why this is a style for more experienced carpenters as well as a more costly design detail.
 |
| Detail construction of a coffered ceiling |
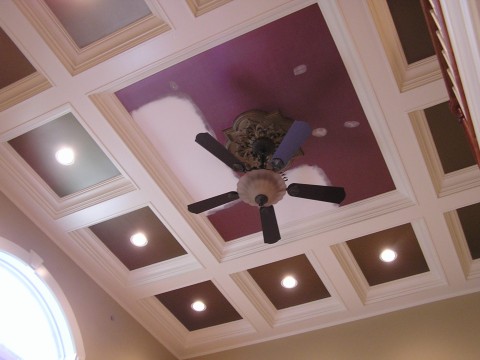
In this coffered design we used a central square with smaller squares around the perimeter of the room. We then painted a metallic paint from Modern Masters to give more definition to the design.
 |
| Creative Design Group |
The next favorite ceiling detail is the tray ceiling. Although this style is not as detailed, many interesting embellishments can be done to make them a focal point in the room. Painted, wall papered or stenciled they will add interest to an otherwise plain design.
 |
| Found on Zillow.com |
 |
| Creative Design Group |
In the stepped tray ceiling design above a flat and semi-gloss finish, in the same color, were used to create a two tone effect giving the ceiling a 3-D effect. The flat finish was used as the base coat, then after taping off the area, corner to corner, the semi-gloss color was added to opposite sides. The photo below shows how the light from the chandelier plays off the colors. The client loved this simple and inexpensive design!
 |
| Creative Design Group |
A textured wall covering product, resembling a tin ceiling pattern, was applied the tray ceiling below then painted a bold cranberry red color to coordinate with the traditional pattern on the walls. We left the steps in a white to accentuate the step design.
 |
| Creative Design Group |
I'm kicking myself for not getting a before shot of this cathedral ceiling! Believe me when I say it was as plain as you could get. Except for the skylights, it had absolutely nothing going for it! It was plain, white and boring, but we changed all that.! To add definition and character, we designed faux wood beams on the ceiling. Details are in the photo below. Because the ceiling is so high, nearly 20 feet, we painted it a soft gray green, leaving the faux beams white to make them pop! This ceiling design makes the room look more cozy.

 |
| Faux wood beams |
I love this cathedral ceiling detail because of the contrast of the wood beams against the white planks. This design is from the 2015 HGTV Dream Home. I wouldn't mind having insomnia in this room!
 |
| Found on lizmarieblog.com |
This design is like the poor mans coffered ceiling! It's made with a simple flat stock pine then painted white to contrast with the ceiling color. This is definitely a DIY project. With just a little pre-planning to get the layout just right.
 |
| Found on Theprojectgirl.com |
This next design is my favorite because I'm planning to do this in my kitchen soon! My plan is to create a poor mans coffered ceiling with a cottage look for our Cape Cod style home. The current ceiling is plaster and lath and I don't want to remove it (too much work) so covering it up is the best solution! When I came across this photo I said, "that's it"!

Just look at the character this ceiling design adds to the room! These appear to be wooden shapes that were applied to a flat painted ceiling. Again with a little pre-planning it would be a fairly simple DIY project.
 |
| Found on houseofturquoise.com |

 |
| Mirrored ceiling detail |
This is a great ceiling detail for over a kitchen island, or any area where you want to define space, like a small eating area over a table, or seating area in a room. Even though this design is recessed, you could create the same effect in reverse using different moldings. Painted, wall papered, or even fabric in the center would look great! Think out side that box for design inspiration!
 |
| Found on Homedit.com |
Now, you don't have to have any great painting skills to do this stencil design because you could just use an appliqué. Many stick on designs can be found at your local Hobby Lobby store. This is a fabulous looking and inexpensive treatment!
|
| Found on Pintrest |
Well, that wraps up my Friday Favorites for this week. I hope you got some design inspiration for your next project. Whether you paint, wall paper, stencil or use simple trim to create an interesting ceiling accent be adventurous and don't forget to look up… Lets get creative!
Until next time,
Tina
No comments:
Post a Comment